All the borders with white triangles suddenly made me think of sharks and their multiple rows of teeth, so I'm going to rename the sweater Jaws.
The centre back and front sections are finished; right now I am crocheting "seams" in the steeks before cutting them to secure the strands. Next step will be joining the shoulders and then pick up stiches along the whole back and front to knit side panels and sleeves.
Friday, 21 January 2011


Friday, 14 January 2011
Hello sunshine

The sun made a guest appearance today (it's been very cloudy recently) so I managed to take a photo of "Andes" that shows the colours properly. There will probably be 12 borders of white "teeth" in all, and I'm going to frame this section (shoulders, side panels and sleeves) with the greyish brown used in the split bottom border.
Let me tell you it's quite satisfying looking at all the dangling ends in the middle of the steek to the right knowing I won't have to weave in a single one of them!
In a comment on my previous post Ing-Marie i Säter asked me if the small project was a sleeve or a swatch. It was a swatch, partly to test gauge but mainly to try different ways to combine my colours. (Photo of the original version here.) These are my thought behind my colour choices:
1. My stash: 7 skeins of greyish brown, 3 natural white and 1 warm brown means lots of greyish brown for the frame, side panels and sleeves; leftover colours concentrated to the back and front centres.
2. Natural white used in all the borders for stability and to combine the other colours with (they all look good next to it) - and simply because I have quite a lot of it.
3. Two shades of brown (cool greyish and warm yellowish) alternating for variation.
4. Two purl ridges in differerent colours below each brown section. Yellow and orange looked nice with warm brown, and light brown and dark brownish green looked nice with cool brown.
5. Colour sequence alternating for variation: yellow-orange, brown-green, orange-yellow, green-brown...
There are many good challenges involved in this project. Apart from testing different ways to use the colours and trying a new way to construct a sweater, it's good to practise getting even tension when stranded colourwork and plain stocking stitch is combined.
Wednesday, 12 January 2011
Returning to Marianne Isager
First of all, thanks for all the wonderful comments on my last post!
Knitting lace shawls is great, but so is variation - so I've been looking for inspiration in my knitting books. Trust Marianne Isager! Here's an intriguing design in "Inca Knits" that I haven't paid much attention to before, but which kind of gave my stash a come-hither stare.
The construction is one I haven't tried and never would have thought of, for that matter. First you knit the multi-coloured sections of the back and front; then you pick up stitches along the sides to knit not only the sleeves but also the side panels.
Any modif ications? Yes!
1. Colours. I'm using greyish brown and natural white Shetlandsuld I bought about half a year ago when my LYS celebrated 25 years. I'm spicing it with some leftovers from Zaire. The photo to the left does not do the colours justice, but will at least give you an idea.
2. I'm not knitting the multi-coloured sections back and forth, but in the round with steeks. A bonus is not having to weave in any ends: I start new rows in the middle of a steek and will simply cut the steeks open and trim the edges.
3. Minor modifications in the pattern with an extra colour and two stocking stitch rows skipped between purl ridges.

Knitting lace shawls is great, but so is variation - so I've been looking for inspiration in my knitting books. Trust Marianne Isager! Here's an intriguing design in "Inca Knits" that I haven't paid much attention to before, but which kind of gave my stash a come-hither stare.
The construction is one I haven't tried and never would have thought of, for that matter. First you knit the multi-coloured sections of the back and front; then you pick up stitches along the sides to knit not only the sleeves but also the side panels.
Any modif
ications? Yes!1. Colours. I'm using greyish brown and natural white Shetlandsuld I bought about half a year ago when my LYS celebrated 25 years. I'm spicing it with some leftovers from Zaire. The photo to the left does not do the colours justice, but will at least give you an idea.
2. I'm not knitting the multi-coloured sections back and forth, but in the round with steeks. A bonus is not having to weave in any ends: I start new rows in the middle of a steek and will simply cut the steeks open and trim the edges.
3. Minor modifications in the pattern with an extra colour and two stocking stitch rows skipped between purl ridges.
Wednesday, 5 January 2011
Estonian shawl finished
This is how my knitted-on edge turned out. Not sure how far my yarn would last I decided to knit a pattern that could be cast off practically any time; this one consists of two different pattern rows and two plain rows.
There was more yarn than I expected, so I ended with a few pattern rows with extra increases for more pronounced points. I'm pleased with the edge (I wanted something airy to balance the fairly compact main pattern) although I think the original design is prettier.
That goes for the whole shawl, by the way, even though I'm happy with my modifications - and even happier that I've left my old fear of experimenting and taking liberties with patterns behind. I've learnt a lot (and still do) from following instructions, but it's nice not to have to depend on them all the time.
 My modifications in short:
1. Variation star motif used. It's bigger, so I made this shawl five stars wide instead of seven.
2. Garter-stitch border skipped.
3. Centre "grid" pattern resized to blend with the stars, and I added different groups of nupps to it.
4. Edge knitted on instead of made separately and sewn on. (Which keeps this from being a real Haapsalu shawl, but I guess it's safe to call it Haapsalu-ish!)
The finished shawl measures ca 115x105 cm (45x41 in).

There was more yarn than I expected, so I ended with a few pattern rows with extra increases for more pronounced points. I'm pleased with the edge (I wanted something airy to balance the fairly compact main pattern) although I think the original design is prettier.
That goes for the whole shawl, by the way, even though I'm happy with my modifications - and even happier that I've left my old fear of experimenting and taking liberties with patterns behind. I've learnt a lot (and still do) from following instructions, but it's nice not to have to depend on them all the time.
My modifications in short:1. Variation star motif used. It's bigger, so I made this shawl five stars wide instead of seven.
2. Garter-stitch border skipped.
3. Centre "grid" pattern resized to blend with the stars, and I added different groups of nupps to it.
4. Edge knitted on instead of made separately and sewn on. (Which keeps this from being a real Haapsalu shawl, but I guess it's safe to call it Haapsalu-ish!)
The finished shawl measures ca 115x105 cm (45x41 in).
Monday, 3 January 2011
Living on the edge

Here's my first attempt at a border around the Estonian shawl. I really like the one in the original design (easy to see in the shawl knitted by Flickr's annalore) but knitting it separately and then sewing it on - no thanks. So, I decided to pick up stitches around the shawl and then knit the border pattern upside-down instead - and resize the pattern to match my number of stitches. (Anything to avoid sewing.)
Unfortunately, knitting a pattern with nupps in the round didn't work,at least not for me: no matter how I try one of the stitches next to a nupp becomes enormous, looking like a big hole. I thought about knitting this section back and forth instead, but finally decided to try something completely different instead. What I've done so far looks promising, but I haven't knitted enough for good pictures yet. Will get back! Frogging the edge at least gave me an opportunity to take a picture of the shawl. I'm quite excited about it and wonder how big the finished shawl will be. Unblocked and without a border it's about 70 cm (27½ in) wide. I've knitted lace shawls with this yarn before and they grew considerably during blocking.
This one may not grow quite as much, though, since I'm using slightly thinner needles (3½ mm/ US 4) and I don't know if the nupps will make a difference.
Here are some basic notes how I knitted the baby cardigan:
- I cast on ca 90 stitches.
- After getting the desired width I knitted about 1/3 of the stitches with a separate thread (for the sleeve) and then went on as before.

- When the back was wide enough I did the same thing for the second sleeve and then went on to knit the second front.
- Strand removed and stitches picked up around the armholes; sleeves knitted in the round to desired length.
- Shoulder joins sewn together.
- Buttons sewn on and loops crocheted.
- Strings crocheted to be able to tie the two fronts together on the inside.
Happy new year, everyone!
Wednesday, 29 December 2010
A spot where I didn't bring my knitting
It would get wet in the outdoors hot tub. I took this photo in the morning of the 24th; it was biting cold and in the evening even colder, -35C (-31F). I thought it was too cold to get into the tub that day, but did the next two when we enjoyed a heatwave of ca -20C (-4F). Unbelievably wonderful, especially when it was dark and the stars were out! And yes, I even got into the lake at one point! The water was so cold it didn't feel cold, but tickled all over the fraction of a second I was in. Once was enough, though.
 I've finished the baby cardigan I wrote about in my previous post. I think it's a great construction for a baby garment: very elastic and practically seamless with only two short shoulder joins. Aren't the buttons we found at Yll o tyll cute? There's enough yarn left for a matching cap.
 I've finished the baby cardigan I wrote about in my previous post. I think it's a great construction for a baby garment: very elastic and practically seamless with only two short shoulder joins. Aren't the buttons we found at Yll o tyll cute? There's enough yarn left for a matching cap.
Wednesday, 22 December 2010
Great expectations
A colleague of mine is expecting a baby and asked me if I could knit her a baby cardigan. She knits too, so we met up at our LYS the other day; there was a cardigan there with a shape that I found inspiring (or theft-worthy, if you like) and we found some baby merino wool there too. Purchase-worthy wool, I should add.
The cardigan is knitted sideways and the two fronts will overlap. I've added a pattern, partly to make it more fun to knit, partly to make it easier to get the three sections the same size. I'm not sure what I think of it, though, now that it's moved from a pattern idea to reality. Green lips, Kaa hypnotizing Mowgli, cabbage... Well, as long as it doesn't look like the evil eye!

The cardigan is knitted sideways and the two fronts will overlap. I've added a pattern, partly to make it more fun to knit, partly to make it easier to get the three sections the same size. I'm not sure what I think of it, though, now that it's moved from a pattern idea to reality. Green lips, Kaa hypnotizing Mowgli, cabbage... Well, as long as it doesn't look like the evil eye!
Sunday, 12 December 2010
Wristwarmers

For the sake of variety I've been knitting wristwarmers recently. This pattern was a free gift from Ravelry's jdw at the knitting camp I attended back in August. I've added pearls in groups of five and a row of holes. They're for my friend Annika, who has asked for white, thin, warm wristwarmers.
The yarn is BC Semilla Fino, organic fingering weight wool, and I used 2 mm needles (US 0). They're knitting diagonally; you can see it more clearly in this photo. I do like the effect you get with variegated yarn. These are leftovers from a hat I knitted a couple of months ago.
Isn't it fascinating how different they look compared to the white ones? The shape is the same, but the different colours and the way the diagonal is accentuated give them a completely different look.
Thursday, 9 December 2010
Correcting a mistake

The past few weeks have been unusually cold. I took these photos on my way to work last Thursday morning. It was almost -20 Celsius (-4 Fahrenheit) but fortunately it isn't that cold now.
I'm making progress with the Estonian shawl. My intention was to have identical groups of nupps in all the centre-section quadrangles, but mixed up rows and accidentally started too early the second time around.
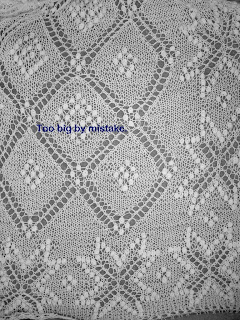 I didn't discover this mistake until a couple of rows later, and instead of ripping these out I decided to correct my mistake by simply deciding this was what I wanted instead. Actually, it's a good opportunity to find out how different nupp patterns ideas will look in reality!
Wednesday, 1 December 2010
Shawl progress and sweater progress
I'm having a lot of fun knitting the "Crown Prince" shawl from Nancy Bush's book, but can't resist making some modifications.
1. The star is the variation motif in the book. I really like it that there are variations of many of the motifs!
2. I've skipped the garter-stitch frame, simply because I'm not very fond of it, especially not combined with lace.
3. I've resized the centre section repeats, making them the same width as the stars. In the original design they are different and don't match, although it doesn't show that clearly thanks to the garter-stitch frame between the sections.
4. Personally, I like symmetry too much not to do something about it, though, and I also like blending pattern sections. Resizing meant making the repeats bigger, so I'm adding a little cluster of "nupps" too, barely visible in this photo. To be continued.
I've been working with my red sweater too: both sleeve caps are finished. I decided to make the second one while I remembered how I made the first one - and understand my hastily scribbled notes. You know, knitting held in one hand, pencil hopefully in the hand you normally write with...

I'm testing a new idea for sleeve gussets too, but I think that will have to be in another post.
Last but not least: dear friend E. is happy with the hat I gave her for her birthday.

1. The star is the variation motif in the book. I really like it that there are variations of many of the motifs!
2. I've skipped the garter-stitch frame, simply because I'm not very fond of it, especially not combined with lace.
3. I've resized the centre section repeats, making them the same width as the stars. In the original design they are different and don't match, although it doesn't show that clearly thanks to the garter-stitch frame between the sections.
4. Personally, I like symmetry too much not to do something about it, though, and I also like blending pattern sections. Resizing meant making the repeats bigger, so I'm adding a little cluster of "nupps" too, barely visible in this photo. To be continued.
I've been working with my red sweater too: both sleeve caps are finished. I decided to make the second one while I remembered how I made the first one - and understand my hastily scribbled notes. You know, knitting held in one hand, pencil hopefully in the hand you normally write with...
I'm testing a new idea for sleeve gussets too, but I think that will have to be in another post.
Last but not least: dear friend E. is happy with the hat I gave her for her birthday.
Wednesday, 24 November 2010
Proving myself wrong
In a previous post I mentioned that I'm not very fond of bobbles. Well, seeing this shawl by Rod on Flickr reminded me of my natural white Viva and the fact that I've only knitted a swatch or two testing a couple of patterns in Nancy Bush's book Knitted Lace of Estonia.
This is half a star, the Crown Prince pattern. I like it very much that the bobbles are fairly flat; the combination of them and the lace holes of roughly the same size is very appealing too, in my opinion.
Here's a photo of the shawl, made by Knitting Soo on Flickr. It's very pretty, but I can't help thinking about possible modifications... A frame consisting of rows of holes instead of garter stitch, for example.
Getting the tension right for the bobbles was a bit tricky, but didn't take very long after all. I've had more trouble with the tension in the stocking-stitch areas: for example, getting the loops for a bobble (a "nupp" in Estonian) loose enough tends to rub off on the surrounding stitches - and purling all the loops making a single stitch tends to make me purl the surrounding stitches too tight.
I enjoy knitting this kind of pattern a lot, primarily because it's something I haven't done before. (A tiny swatch about a year ago hardly counts.) Also, dear old wool-silk blend Viva is a delight to work with, and the sheen of it makes the bobbles almost look like pearls in daylight. Not captured in this photo due to severe lack of daylight.

This is half a star, the Crown Prince pattern. I like it very much that the bobbles are fairly flat; the combination of them and the lace holes of roughly the same size is very appealing too, in my opinion.
Here's a photo of the shawl, made by Knitting Soo on Flickr. It's very pretty, but I can't help thinking about possible modifications... A frame consisting of rows of holes instead of garter stitch, for example.
Getting the tension right for the bobbles was a bit tricky, but didn't take very long after all. I've had more trouble with the tension in the stocking-stitch areas: for example, getting the loops for a bobble (a "nupp" in Estonian) loose enough tends to rub off on the surrounding stitches - and purling all the loops making a single stitch tends to make me purl the surrounding stitches too tight.
I enjoy knitting this kind of pattern a lot, primarily because it's something I haven't done before. (A tiny swatch about a year ago hardly counts.) Also, dear old wool-silk blend Viva is a delight to work with, and the sheen of it makes the bobbles almost look like pearls in daylight. Not captured in this photo due to severe lack of daylight.
Monday, 15 November 2010
Shaping a sleeve cap

Some people have asked me how I shape sleeve caps using short rows, so I'm going to try to explain in this post.
First, I pick up stitches along the armhole after joining the shoulder seams (see photo at bottom of post) and mark the middle stitch with a thread.
I start knitting the sleeve somewhere near the middle; in this case I chose making the 15 stitches in the middle the top of the sleeve cap. After knitting those I wrap the yarn around the next stitch before turning the work (to avoid an unsightly gap).
Next row I first knit the 15 stitches and then a few more (in this case 5) before wrapping and turning. Each row I add a few more stitches before wrapping and turning until all the picked-up stitches are knitted. It will look like this in terms of shape. How many stitches I choose to add depends on what kind of shape I want the sleeve cap to have.

Wednesday, 10 November 2010
Two finished objects

The colour looks a bit strange in the original photo, so I thought I might as well make a black and white version. This was a nice project to knit, quick once past the first few inches and the shape is different from what I usually knit.
Trying something new is always rewarding! Combining alpaca and linen was a good idea too (not mine but suggested at my LYS). We'll just see how my cousin likes wearing it: the garment is rather heavy, almost 800 grams.
The shawl I wrote about in my previous post is also finished. For the bottom border I chose the border from "The Opera Fichu", also in Victorian Lace Today. As mentioned, I wanted fairly simple lace patterns using this yarn and since I've knitted the fichu before I knew it would curl - I simply cast it off loosely from the wrong side, not bothering about a knitted-on border around the shawl (which I normally like).
My plan is to make it a guest shawl, for people to borrow when they visit. We had quite a lot of snow yesterday, but today is rather wet and windy. And cold: a guest could definitely need a shawl.
Thursday, 4 November 2010
Possession
The other day I surprised myself by finishing a project before starting a new one. "Wightwizzle" is washed and blocked and left to dry while I'm visiting relatives for a couple of days.
Less surprising is my ability to buy yarn. Last weekend I couldn't resist buying two hanks of beautiful natural grey "Töis", soft and light 1ply wool from the island of Gotland.
This wool is quite fuzzy, so I wanted a fairly simple design, something based on straight lines (intricate lace patterns would drown) and decided to return to Jane Sowerby's Spider-web's shawls in Victorian Lace Today. I've made use of it twice before, for Eva and for Anna; in both cases I used wool-silk blend Viva, but I think it works with this yarn too. Come to think of it, starting Eva's shawl coincided with starting this blog!
It takes 5½ hours to go from Uppsala to Västervik, so I managed to get quite a lot done even though I kept alternating between this project and a fascinating book I'm reading, Possession by A.S. Byatt. Read a chapter, think about it while knitting for a while, read another chapter... A great way to digest a great book!

Less surprising is my ability to buy yarn. Last weekend I couldn't resist buying two hanks of beautiful natural grey "Töis", soft and light 1ply wool from the island of Gotland.
This wool is quite fuzzy, so I wanted a fairly simple design, something based on straight lines (intricate lace patterns would drown) and decided to return to Jane Sowerby's Spider-web's shawls in Victorian Lace Today. I've made use of it twice before, for Eva and for Anna; in both cases I used wool-silk blend Viva, but I think it works with this yarn too. Come to think of it, starting Eva's shawl coincided with starting this blog!
It takes 5½ hours to go from Uppsala to Västervik, so I managed to get quite a lot done even though I kept alternating between this project and a fascinating book I'm reading, Possession by A.S. Byatt. Read a chapter, think about it while knitting for a while, read another chapter... A great way to digest a great book!
Tuesday, 2 November 2010
The catsitter
I'm looking after a friend's cat for a few days and thought I might as well pack up some projects and books and move in. As you can see, Sally is only mildly interested in knitting.
There's only a sleeve left to knit before "Wightwizzle" is finished. As planned, I'm not knitting the sleeves separately but pick up stitches around the armholes and shape the caps using short rows instead. I find it a lot easier than sewing sleeves in place - and it looks neater too.


There's only a sleeve left to knit before "Wightwizzle" is finished. As planned, I'm not knitting the sleeves separately but pick up stitches around the armholes and shape the caps using short rows instead. I find it a lot easier than sewing sleeves in place - and it looks neater too.
Subscribe to:
Posts (Atom)