Showing posts with label sleeve cap. Show all posts

Sunday, 21 July 2013

"Alba" sleeves

"Alba" shoulder join by Asplund
"Alba" cardigan: shoulder join, a photo by Asplund on Flickr.
Here is the shoulder join: it is identical to the one I made for the sweater I finished some time ago. The sleeve is different, though, as there is no sleeve cap shaped with short rows.

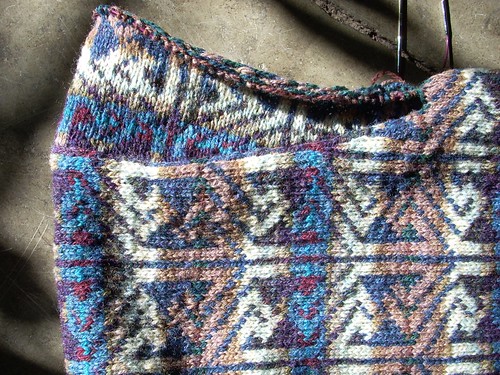
Ann asked how I made those: starting with seven stitches in the middle I knitted back and forth adding three stitches each row until I had knitted all the stitches picked up around the armhole and could start knitting in the round. I was happy with how it turned out, but didn't feel like knitting lots of purl rows with two strands this time.

Alba sweater: sleeve cap


Instead I concentrated on figuring out where to start in the pattern. My aim was to make sleeve match the body, so I knew exactly where in the pattern I wanted the sleeve to end - but I also wanted to start where it would look good (I don't like it when patterns look amputated, and these repeats consist of 40 rows) and get the length right, of course.

Alba cardigan: body and sleeve


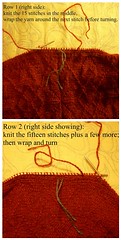
Jules asked about the Donegal border, whether it was my own or a new version by Alice Starmore. It is Starmore's, the one that you get with the kit. I modified it slightly, though: instead of casting on with the light colour I chose the darker one and added a couple of purl rows to make the edge curl inwards. There are photos of the original design here.

Sunday, 14 August 2011

"Alba" progress

"Alba" sleeve cap by Asplund
"Alba" sleeve cap, a photo by Asplund on Flickr.
First of all, thanks for all your birthday wishes and lovely comments on my previous post!

Back to work after my summer vacation I've had far less time to knit the past week, but have made progress with "Alba" that I thought I'd share.

The sleeves are modified in three ways:

1. Backand front sections shaped instead of straight from armhole to shoulder to avoid excess fabric under the arm.

2. Sleeve caps made using short rows (see earlier post) also to avoid excess fabric.

3. Pattern turned upside down for shapes and colour sequences to blend better where sleeve meets shoulder.


"Alba" shoulder

Now off to finish the second sleeve cap while I remember how to make it identical!

Wednesday, 1 December 2010

Shawl progress and sweater progress


Estonian shawl wip
Originally uploaded by
Asplund
I'm having a lot of fun knitting the "Crown Prince" shawl from Nancy Bush's book, but can't resist making some modifications.

1. The star is the variation motif in the book. I really like it that there are variations of many of the motifs!

2. I've skipped the garter-stitch frame, simply because I'm not very fond of it, especially not combined with lace.

3. I've resized the centre section repeats, making them the same width as the stars. In the original design they are different and don't match, although it doesn't show that clearly thanks to the garter-stitch frame between the sections.

4. Personally, I like symmetry too much not to do something about it, though, and I also like blending pattern sections. Resizing meant making the repeats bigger, so I'm adding a little cluster of "nupps" too, barely visible in this photo. To be continued.

I've been working with my red sweater too: both sleeve caps are finished. I decided to make the second one while I remembered how I made the first one - and understand my hastily scribbled notes. You know, knitting held in one hand, pencil hopefully in the hand you normally write with...

I'm testing a new idea for sleeve gussets too, but I think that will have to be in another post.

Last but not least: dear friend E. is happy with the hat I gave her for her birthday.

Monday, 15 November 2010

Shaping a sleeve cap


Shaping a sleeve cap
Originally uploaded by Asplund

Some people have asked me how I shape sleeve caps using short rows, so I'm going to try to explain in this post.

First, I pick up stitches along the armhole after joining the shoulder seams (see photo at bottom of post) and mark the middle stitch with a thread.

I start knitting the sleeve somewhere near the middle; in this case I chose making the 15 stitches in the middle the top of the sleeve cap. After knitting those I wrap the yarn around the next stitch before turning the work (to avoid an unsightly gap).

Next row I first knit the 15 stitches and then a few more (in this case 5) before wrapping and turning. Each row I add a few more stitches before wrapping and turning until all the picked-up stitches are knitted. It will look like this in terms of shape. How many stitches I choose to add depends on what kind of shape I want the sleeve cap to have.


Tuesday, 2 November 2010

The catsitter


"Wightwizzle" wip
Originally uploaded by Asplund
I'm looking after a friend's cat for a few days and thought I might as well pack up some projects and books and move in. As you can see, Sally is only mildly interested in knitting.

There's only a sleeve left to knit before "Wightwizzle" is finished. As planned, I'm not knitting the sleeves separately but pick up stitches around the armholes and shape the caps using short rows instead. I find it a lot easier than sewing sleeves in place - and it looks neater too.