Showing posts with label sleeve. Show all posts

Thursday, 10 December 2015

Mosaic sweater progress


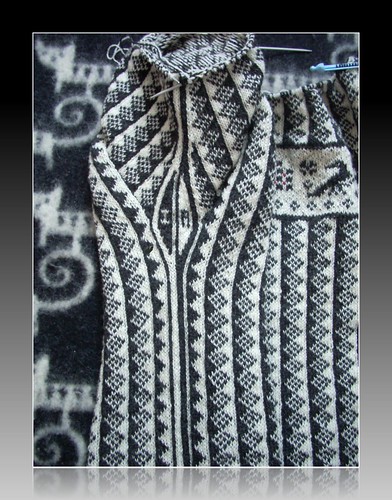
It took some thinking and rethinking (not to mention knitting and reknitting) before I made up my mind about the sleeves. I decided patterned sleeves would be too much of a good thing; instead they would be grey with slipped stitches to create vertical lines like the ones in the body, the one in the centre elongating the line created by the shoulder join.

Here's the first attempt - or, rather, the third one, but the first one I took a photo of:


The slipped-stitch lines are evenly spaced, with the same number of stitches between them as there are between the lines on the back and front. A good idea in theory but less so in practice; it would look just fine if the sleeve was a separate unit (a not particularly useful garment) but attached to the body it simply doesn't look very tidy.


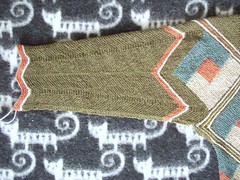
Here's the final arrangement, where the lines blend with the mosaic pattern repeats. This solution entailed narrower centre panels, but I actually think it looks as if this might be the original thought rather than a solution:


Right now I'm thinking of different mosaic pattern ideas for the cuffs to add some colour to them. Also, I will probably also add something to the provisional neckband.

Sunday, 29 January 2012

Sleeves and gussets - ärmar och kilar

Sleeve gusset by Asplund
Sleeve gusset, a photo by Asplund on Flickr.
First of all, thanks for all your kind comments on my previous post!

Ron asked about checkerboard borders, whether they are typical here. I would say they are not uncommon but not exactly typical. Personally, I like how it looks and enjoy knitting it more than stripes as I see progress more quickly. I was quite intrigued by Carolina's comment about checkerboard traditions in other cultures.

It seems I'm going to keep this sweater for myself - those are my initials if you look at the sleeve gusset! (Of course it could mean simply that I made it, not that I necessarily own it, so we'll see how I will interpret it once the sweater finished - and I have tried it on!)

sleeve decreases - ärmminskningar

I'm happy with the sleeve decreases. I usually go for one of two options: hiding the decreases as much as possible or accentuating them to turn necessity into a decorative element, like in this case. I think it has a kind of calming effect in this kind of pattern separating the decreases with a dark grey and a white column, and they go well with the side columns too (which is where I got the idea from).

The cuffs are striped like the bottom border but with the saddle pattern on the inside. I like details that aren't obvious at first sight. The body starts with a red picot edge; the sleeves have a red edge too, but not picots.

I will use a similar pattern for the neckband: stripes, a contrast colour for the edge. Probably not red but perhaps green or blue.


När jag formar ärmar (oftast med minskningar, eftersom jag gillar att plocka upp maskor runt ärmhålet och sticka ärmarna uppifrån) brukar jag försöka att antingen gömma minskningarna så gott det går eller framhäva dem genom att utnyttja dem till ett extra mönster. I det här fallet valde jag det senare med minskingar på var sida om en mörgrå och en vit rand. Jag tycker att det passar ihop med mönstret i sidan på tröjan och så har det liksom en lugnande effekt - det skulle bli rörigt där minskningarna möts.


Under ärmen har jag gjort en kil och på den ena har jag stickat in mina initialer, så det verkar som om jag får behålla den här tröjan - också. Visserligen skulle det kunna innebära att jag helt enkelt har gjort tröjan, inte att jag nödvändigtvis är ägare, men jag lutar ändå åt den första tolkningen. Vi får se när den är färdig och jag har provat den. Kanske ändrar jag mig då!


Muddarna är smalrandiga för att passa ihop med nederkanten på tröjan, men i stället för röda uddkanter har jag nöjt mig med ett rött vikvarv. På insidan har jag samma rutmönster som över axlarna; jag är svag för detaljer som inte syns med en gång. Halskanten kommer också att bli smalrandig, har jag tänkt mig - fast kanske med en annan kontrastfärg. Grönt eller blått ligger bra till. 


Tack för alla fina kommentarer!

Friday, 28 May 2010

"Pacific" progress


I'm knitting the second sleeve, shaping the cap with short rows and then knitting in the round.

In the instructions there is no shaping, but I like the way it removes excess fabric. Also, I decided to frame the cable with a white vertical row where I picked up stitches (see left sleeve). I did this with a crochet hook.

Another modification is the way I have changed the sleeve pattern. Instead of the original design's striped sleeves with two cables (which I thought would be too monotonous to knit) I have used the parallelograms from the body for the sleeves too; only two, though, and placed closer to each other.

Still, my sleeve does have a cable too: I picked up the stitches of the middle side cable to let it run from hip to wrist.

Last, I'm happy to be able to brag about getting the Beautiful blogger award a second time, now from Ann. Mange tak! I hope you don't mind my simply linking to the post about seven things about myself.

Friday, 26 March 2010

"Zaire" sweater: sleeve


"Zaire" sweater: sleeve
Originally uploaded by
Asplund
First sleeve nearly done! I haven't made up my mind how to finish the cuff, so I've started knitting the second sleeve.

I will probably fill in the gaps with green triangles to make the cuffs similar to the body. Another colour could be used for variation, of course, or the edge could even be scalloped. (I really don't think the last idea would work very well with the overall design, which practically consists of straight lines going in different directions. Thinking about different ideas is fun, though! )

For a while I toyed with the idea of having more stripes, but suddenly remembered the drummer accompanying Sarah Vaughan in this clip and changed my mind instantly. But how I would have loved to be there hearing her live!

Sunday, 31 January 2010

"Monk" jacket: sleeve shaping


"Monk" jacket: sleeve
Originally uploaded by
Asplund

This is what the first sleeve looks like so far. As I couldn't make up my mind whether to make diagonal or vertical stripes, I simply went for both.

First I knitted a few rows where the lines slanted in the opposite way from the centre; thus, they formed a point downwards, which I intended to turn into a vertical line.

However, that just looked messy, so I tried this way instead and like it a lot better. I should have taken a photo before ripping out those rows for comparison – well, you'll just have to believe me this is the better version!

A method I first tried a few years ago is shaping the top of knitted-on sleeves by using short rows. It results in a more fitted and comfortable sweater than a regular drop-shoulder sweater – and you don't have to sew the sleeve in place. First time I tried it I wasn't bold enough to shape it very much, but at least I could see it was possible to knit a sleeve that way. Second time it turned out a lot better.

Unfortunately, I'm not sure where I got the idea from. Others must have thought of it too, but I can't remember ever reading about this method. I think it simply came from a desire to shape sleeves better but not having to sew them in place. Necessity is the mother of invention.

This project devours yarn, so I'm going to knit the sleeves before deciding about the hood. Perhaps there won't be enough yarn for it, but then I actually might skip it anyway and make some kind of collar instead. I think hooded jackets look nice, but I never really liked wearing them.

But can a hoodless version be called "Monk"? Perhaps "De-hooded Monk" or "De-monked jacket"? Other suggestions?