Showing posts with label short row shaping. Show all posts

Thursday, 31 December 2015

Mr Mosaic

Mosaic knitting has given me ideas - I've been experimenting with hats knitted sideways, combining mosaic knitting and garter stitch. Not quite there yet as one of them is slightly too big and the felted one is slightly too small, but I like them anyway. They look like rainbows with icing:


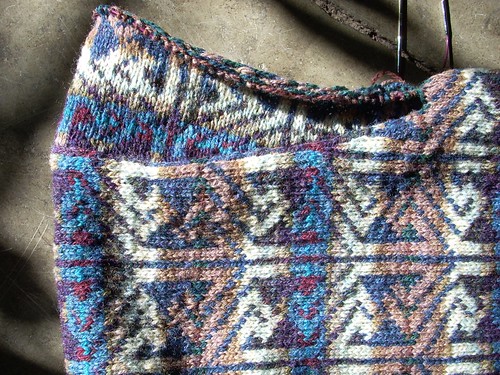
My Japanese-inspired mosaic sweater is finished - or at least practically finished. I might reknit the neckband, adding a few rows too it, but otherwise I'm very happy with how it fits. For my first neckband attempt I chose a darker shade of green to match the last patterned row, but the distance between them made the neckband look a lot darker, so I gave it another try with a lighter and brighter shade of green.


A good thing about the lighter shade is that it works better with the sleeve cuffs, where I added a small mosaic pattern. Perhaps I could call the sweater Babar? (The cuffs remind me of his feet, which is why I didn't choose a brown shade - who wants to wear dirty toenails?)


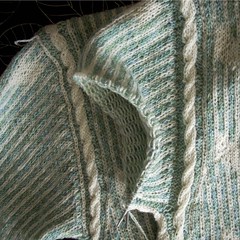
This sweater needed extra side panels or it would have been slightly too tight for my taste. (Also, there isn't much weight to lose when it comes to my rather scrawny chest, and sawing off a couple of ribs wasn't a particularly tempting idea.) I was prepared for this early on but decided not to make up my mind until I had knitted the sleeves, although my idea was to make use of a contruction I tried a few years ago knitting (and modifying) another design by Marianne Isager. I actually enjoy turning something necessary into an opportunity to add a nice finishing touch to a project.

side panel
This solution, using slipped stitches to create columns, echoes how the sleeves go with the body; casting off from the right side creates a ridge in the middle that not only goes with the shoulder joins, but also blends with the seam under the sleeve.

Finally, a couple of short-row details before ending this year's last and rather self-congratulatory blog post:

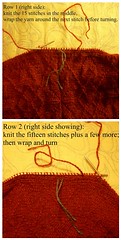
short rows that create a sleeve cap

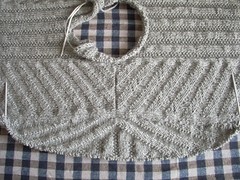
short rows that create a sleeve gusset sideways

Happy new year!


Sunday, 14 August 2011

"Alba" progress

"Alba" sleeve cap by Asplund
"Alba" sleeve cap, a photo by Asplund on Flickr.
First of all, thanks for all your birthday wishes and lovely comments on my previous post!

Back to work after my summer vacation I've had far less time to knit the past week, but have made progress with "Alba" that I thought I'd share.

The sleeves are modified in three ways:

1. Backand front sections shaped instead of straight from armhole to shoulder to avoid excess fabric under the arm.

2. Sleeve caps made using short rows (see earlier post) also to avoid excess fabric.

3. Pattern turned upside down for shapes and colour sequences to blend better where sleeve meets shoulder.


"Alba" shoulder

Now off to finish the second sleeve cap while I remember how to make it identical!

Monday, 15 November 2010

Shaping a sleeve cap


Shaping a sleeve cap
Originally uploaded by Asplund

Some people have asked me how I shape sleeve caps using short rows, so I'm going to try to explain in this post.

First, I pick up stitches along the armhole after joining the shoulder seams (see photo at bottom of post) and mark the middle stitch with a thread.

I start knitting the sleeve somewhere near the middle; in this case I chose making the 15 stitches in the middle the top of the sleeve cap. After knitting those I wrap the yarn around the next stitch before turning the work (to avoid an unsightly gap).

Next row I first knit the 15 stitches and then a few more (in this case 5) before wrapping and turning. Each row I add a few more stitches before wrapping and turning until all the picked-up stitches are knitted. It will look like this in terms of shape. How many stitches I choose to add depends on what kind of shape I want the sleeve cap to have.


Monday, 21 June 2010

"Pacific" sweater finished


One of the many things I love about this yarn (BC Shetlandsuld) is how much softer it becomes when washed. It suits me perfectly, because I prefer working with yarn that isn't too soft and slippery but like most people (I hope!) would rather not wear a scratchy sweater.


Modifications in short:

1. Bluish-green stripes made wider (because I like the colour so much and wanted to make it more dominant).
2. Purl stitches around cables (for a deeper relief effect).
3. Sleeve cap shaped (for comfort and to practise shaping stranded caps with short rows).
4. Parallelograms added to sleeves (to make them more fun to knit than just stripes and cables).
5. Side cable in the middle continued along sleeve (because I like hidden details).

Here's what the shoulder join looks like:

Friday, 28 May 2010

"Pacific" progress


I'm knitting the second sleeve, shaping the cap with short rows and then knitting in the round.

In the instructions there is no shaping, but I like the way it removes excess fabric. Also, I decided to frame the cable with a white vertical row where I picked up stitches (see left sleeve). I did this with a crochet hook.

Another modification is the way I have changed the sleeve pattern. Instead of the original design's striped sleeves with two cables (which I thought would be too monotonous to knit) I have used the parallelograms from the body for the sleeves too; only two, though, and placed closer to each other.

Still, my sleeve does have a cable too: I picked up the stitches of the middle side cable to let it run from hip to wrist.

Last, I'm happy to be able to brag about getting the Beautiful blogger award a second time, now from Ann. Mange tak! I hope you don't mind my simply linking to the post about seven things about myself.

Sunday, 31 January 2010

"Monk" jacket: sleeve shaping


"Monk" jacket: sleeve
Originally uploaded by
Asplund

This is what the first sleeve looks like so far. As I couldn't make up my mind whether to make diagonal or vertical stripes, I simply went for both.

First I knitted a few rows where the lines slanted in the opposite way from the centre; thus, they formed a point downwards, which I intended to turn into a vertical line.

However, that just looked messy, so I tried this way instead and like it a lot better. I should have taken a photo before ripping out those rows for comparison – well, you'll just have to believe me this is the better version!

A method I first tried a few years ago is shaping the top of knitted-on sleeves by using short rows. It results in a more fitted and comfortable sweater than a regular drop-shoulder sweater – and you don't have to sew the sleeve in place. First time I tried it I wasn't bold enough to shape it very much, but at least I could see it was possible to knit a sleeve that way. Second time it turned out a lot better.

Unfortunately, I'm not sure where I got the idea from. Others must have thought of it too, but I can't remember ever reading about this method. I think it simply came from a desire to shape sleeves better but not having to sew them in place. Necessity is the mother of invention.

This project devours yarn, so I'm going to knit the sleeves before deciding about the hood. Perhaps there won't be enough yarn for it, but then I actually might skip it anyway and make some kind of collar instead. I think hooded jackets look nice, but I never really liked wearing them.

But can a hoodless version be called "Monk"? Perhaps "De-hooded Monk" or "De-monked jacket"? Other suggestions?